Plugins
WOLF is subdivided into a main library called WOLF core, and a number of WOLF plugins.
WOLF plugins are dynamic libraries that can be loaded at runtime.
This enables a scalable and decentralized development.
It also allows to work with smaller projects, which improves peace of mind and productivity.
Overview
The aim of WOLF is to provide a generic and modular implementation of a multi-sensor fusion using factor graphs.
We created an architecture that is common to many odometry, SLAM, and calibration estimators in robotics.
This genericity is abstracted in a number of base classes.
These are the classes constituting the nodes of the WOLF tree.
Such nodes correspond to the typical entities we encounter in all typical robotics estimation problems:
Sensors
Processors (data processing algorithms, and decision making)
Frames and keyframes
Captures of raw data
Features extracted from the raw data, containing a metric measurement
Factors of the factor graph, associating a metric measurement to states in the problem
Landmarks of the map
All of these entities are common to most robotics problems and have a clear existence in WOLF.
For a more detailed explanation of the role and interplay of these entities, please consult the section WOLF tree before continuing if you have not done so.
The generic code in WOLF is responsible for many tasks, among which:
Providing an organized way to store and access any kind of information – the WOLF tree.
Unifying the API for data processing.
Synchronizing sensory data through a smart handling of time stamps and keyframes:
Decentralized keyframe creation: each processor can create keyframes based on their own criteria.
Decentralized keyframe joining: each processor can join its data to keyframes created by other processors.
Providing generic means for sensor self-calibration.
Communicating the problem with the solver, bi-directionally.
- What we achieve with this is a flexible platform in which any number of front-ends, typically one per sensor,
will contribute to a unique factor graph, which will be solved regularly by the back-end.
Why plugins?
Real robots are equipped with specific sensors and provide specific data, which needs to be processed in a specific way, producing specific results. These specificities are of course not possible to encode in an abstract implementation.
WOLF therefore encapsulates all abstract material in a first library, that we have called WOLF core.
All specificities are packaged in other libraries, that we have called WOLF plugins.
WOLF plugins are dynamic libraries that can be loaded at runtime.
This allows us to build a generic executable that, by parsing a configuration file, is able to load all the necessary plugins and start processing sensory data. This is the role of our WOLF autoconf.
An example of robotics project using WOLF plugins and WOLF autoconf is our WOLF ROS2 demo Laser 2d , which is based on our WOLF ROS2 node and uses the WOLF Laser plugin.
What is a plugin?
A plugin is a dynamic library that contains a few classes.
These classes are derived from the base classes in WOLF core.
They implement some functionality that is specific to a particular kind of sensor, and/or a particular way of processing this sensor’s data.
Here is a simple example of a WOLF project with two specific sensors: an IMU (blue), and a camera (red). The system has two keyframes so far. In each keyframe, we find motion data from the IMU, and images from the camera. Features and factors are also of types specific to each sensory data. We also find landmarks that have been created as the result of features detected in the images.
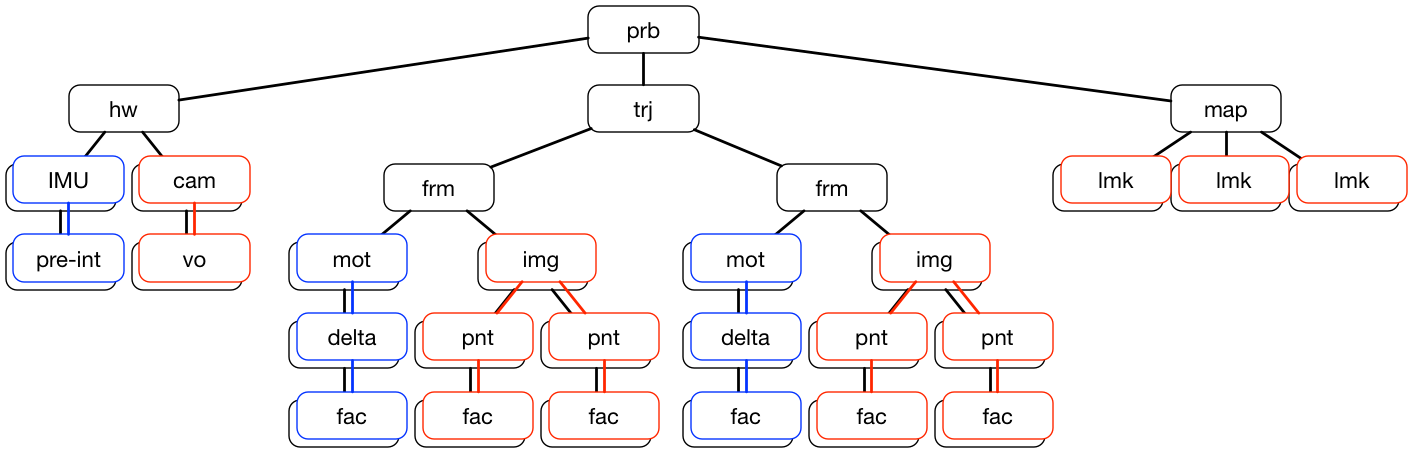
We can observe that:
The top classes of the WOLF tree are in WOLF core, which is represented in black,
Problem:
prbHardware:
hwTrajectory:
trjFrame:
frmMap:
map
The other classes in the WOLF tree are also in WOLF core but as base classes, usually in an abstract form, also represented in black,
Sensor: base class
Processor: base class
Capture: base class
Feature: base class
Factor: base class
All specific classes for the IMU are in the blue plugin, which derives from WOLF core the following classes,
Sensor: inertial measurement unit
IMUProcessor: delta pre-integrator
pre-intCapture: motion data
motFeature: pre-integrated IMU delta
deltaFactor: motion factors
fac
All specific classes for the camera are in the red plugin, which derives from WOLF core the following classes,
Sensor: camera
camProcessor: visual odometer
voCapture: images
imgFeature: point
pntFactor: feature-landmark factors
facLandmark: point
lmk
Using plugins
Installation
To install specific WOLF plugins for your projects, please follow instructions here.
Usage
There are at least three main ways you can use plugins:
Through WOLF autoconf : recommended for flexibility
Loading them at runtime : not recommended
Including them at compile (in fact, linking) time : recommended for small demos and debugging
Loading plugins at runtime
The main interest of loading plugins at runtime is to have compiled executables that ignore, at compile time, the existence of the particular plugins the applications will use.
Achieving this code separation, however, comes at a price:
The compiled application cannot have
#includesto any of the header files in the plugin.Therefore, object creation has to be handled by factory-like methods, thus returning pointers to base class.
Additionally, configuration must be made in some non-compiled format, then parsed by the application and executed.
These three steps are precisely the duties of wolf autoconf.
Our recommentdation is that you follow one of the following approaches:
Should you want these code separation features, you use wolf autoconf — read the previous section.
Should you be happy with an application that does not require such code separation, then use linked plugins — read the next section.
Linking plugins
This is basically using the plugins as any other external library.
In your your application code, you will then have access through the appropriate #includes to all the derived classes in the plugin.
For using the plugin packages using CMAKE, we provide the typical mechanism,
#find
find_package(wolf<plugin> ...)  # Note: use REQUIRED or OPTIONAL as you judge pertinent

#includes
include_directories(${wolf<plugin>_INCLUDE_DIRS})

#to link
target_link_libraries(my_executable ${wolf<plugin>_LIBRARIES})
for example if you are preparing a visual-inertial project, you need the imu and vision plugins,
#find
use_package(wolfimu REQUIRED)
use_package(wolfvision REQUIRED)

#includes
include_directories(${wolfimu_INCLUDE_DIRS} ${wolfvision_INCLUDE_DIRS})

#to link
target_link_libraries(my_executable ${wolfimu_LIBRARIES} ${wolfvision_LIBRARIES})
Each plugin will fetch all its dependencies, so for instance in ${wolflaser_INCLUDE_DIRS},
which requires the WOLF core, the plugin laser, and the library laser_scan_utils,
we already have /path/to/wolf /path/to/laser /path/to/laser_scan_utils.
In your C++ code, you are then able to #include any header file from the plugin.
More specific instructions on how to use plugins as external libraries, if any of these instructions exist, are to be found in each plugin’s documentation.
Writing plugins
Preliminaries
Remember: WOLF plugins are dynamic libraries that can be loaded at runtime.
So, writing a plugin is making a new library, and have it accessible by wolf.
The best way to start is to look at any of the existing plugins, and get inspired by the design.
In particular, see the CMakeFile.txt and use it as a template to start your new plugin.
Note
Remember also that plugins may depend on other plugins. In such case, you just need to take care of this dependence, and you can skip the dependence on WOLF core.
Folder and file organization
A plugin may contain any number of classes deriving from base classes in WOLF core, or from classes in another plugin.
We have strict rules on how to organize a plugin. Basically, it has the same structure of WOLF core, but with fewer directories.
The folders structure of a plugin is the following:
[wolf]/[plugin_name]/
    include/
        [plugin_name]/
            capture/
            factor/
            feature/
            frame/
            landmark/
            processor/
            sensor/
            state_block/
            utils/
            math/
    src/
        capture/
        factor/
        feature/
        frame/
        landmark/
        processor/
        sensor/
        state_block/
        utils/
        math/
        yaml/
    test/
    demos/
The contents of each folder should be evident:
In
include/andsrc/we separate headers from sources, and use the appropriate folder to store the files for each one of the classes that we derive. Processors go toprocessor/, Captures go tocapture/, and so on.In
math/we may put helper mathematical files to be used within the plugin. Notice thatcore/mathmight have some of the math you want!In
utils/we may put helper files of non-mathematical nature to be used within the plugin. Notice thatcore/utilsmight have some of the utils you want!In
yaml/we may put YAML-related code files appropriate for the classes in the plugin. Notice thatcore/yamlmight have the YAML functionality that you want!In
test/we will put unit test files, to be run with ctest.In
demos/we will put small executables to demonstrate or debug the plugin.